ShopDreamUp AI ArtDreamUp
Deviation Actions


Description


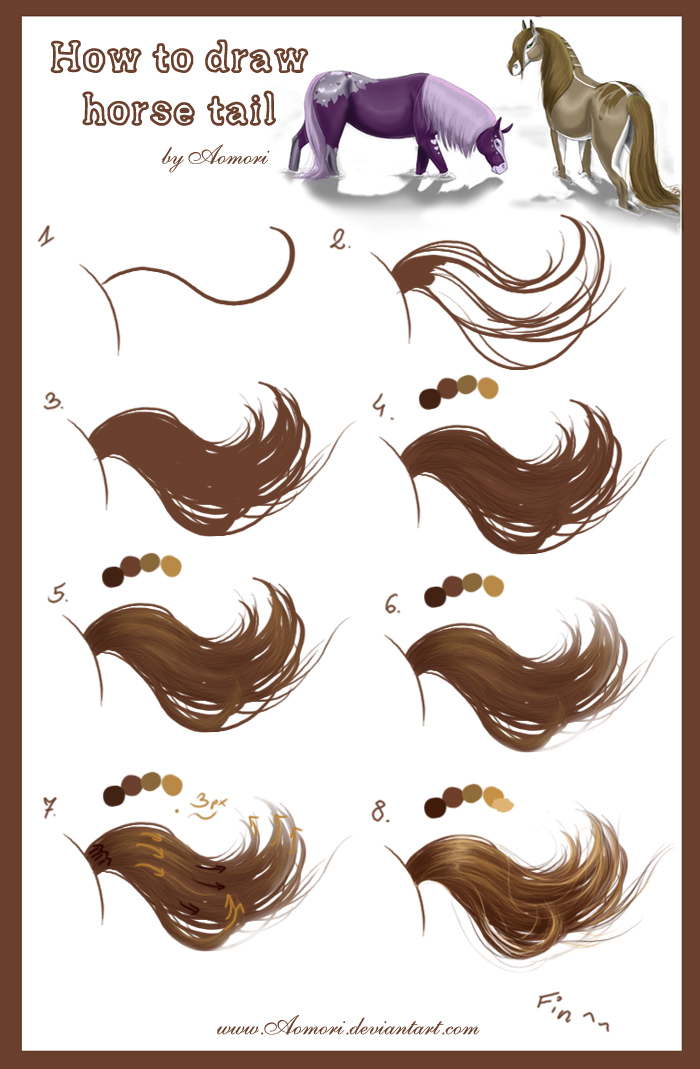
Everything is painted in Photoshop but it should work well in any other painting program (GIMP,SAI, Corel Painter etc)
A little description what to do in each step:
1- draw a basic line that shows how the tail is going to look (with solid brush)
2 - define the shape of tail by adding more lines - thin and bold as you like and how much patience do you have ^^
3 - fill the shape with one color
4 - select the shape of tail ([ctrl] + LMB in Photoshop), choose some colors for shadows and start to draw thin lines. A lot of this lines... (I'm using there my brush made of couple of dots, it's easier this way -> [link] )
5 - repeat the step with highlights
6 - a little trick (yeah
7 & 8 - take small brush (in my case it was 2px with half of an opacity and half of this second option...
In the end I adjusted the contrast to add to the colors some more life
* if anything is hard to understand just say ^^
*** PL ***
Tutorialiku wersja polska (robione pod Photoshopa, ale myślę że może być również pomocne przy innych programach):
Małe wyjaśnienie:
1- narysuj główną linię, która będzie zaznaczała jak ma potem mniej więcej wyglądać ogon (pędzlem o twardych brzegach)
2- popracuj dalej nad kształtem ogonka dodając dodatkowe linie - cieńsze i grubsze, jak tam będzie aktualnie pasować
3- teraz wypełniamy powstały kształt bazowym kolorem
4- zaznaczamy warstwe z ogonkiem (skrót w Photoshopie to: [ctrl] + klikamy lewym przyciskiem myszy na warstwę z ogonkiem), wybieramy kilka kolorów na ciemniejsze i jaśniejsze miejsca i zacznami robić cienie. Tzn rysujemy cienkie linie... Masę cienkich linii (ja tutaj używam takiego domowej roboty pędzla zrobionego z kilku kropek, który bardzo ułatwia sprawę - od razu rysuje się kilka linii - [link])
5- teraz to samo robimy z jaśniejszym kolorem
6 - a teraz mała sztuczka (tia xD) bierzemy areograf o niskich ustawieniach krycia i przepływu - jako gumkę - i usuwamy końcówki ogona. Nie szkodzi, że to wygląda teraz trochę nierealnie
7 & 8 - małym pędzelkiem (ja używałam areografu o wielkości 2 pikseli z ustawieniami po 50% krycia i przepływu – czasem mniej czasem więcej) zaczynamy bawić się w szczegóły. Wykańczamy końcówkę ogona, którą wcześniej trochę zmazaliśmy, dodajemy kilka dowolnych majtających się kosmyków i włosków... I gotowe ^^
Na koniec zmieniłam trochę kontrast, by dodać kolorom życia
* jakby coś było niejasne śmiało pytać ^^
Do not copy or redistribute without my permission
Image size
700x1069px 278.24 KB
© 2008 - 2024 AonikaArt
Comments261
Join the community to add your comment. Already a deviant? Log In
do you have the link for photoshop ( i work with windows 10 so i hope it works )